Landscaping Guide - Sleeper Wall
- jgdcraftedlandscap
- Oct 8, 2018
- 7 min read
If you love working outdoors and think you can handle your tools, then why not give this Sleeper wall project a go. I have put together a simple HOW TO guide for you to follow.
This may, or may not be the best method of construction, but is probably the easiest for a DIY enthusiast. Other alternative materials and construction methods are of-course available, but for this example a straight line sleeper wall will be discussed.
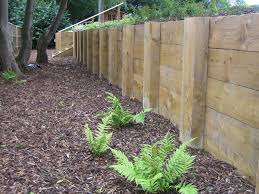
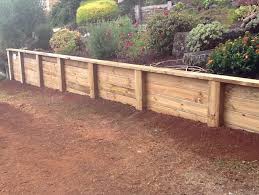
Sleeper Retaining Wall
This can be constructed to split the levels within a garden, Incorporation of a retaining wall works best in a sloped or hilly context. It can help divide spaces and make more usable, accessible platforms. They can be adapted to include seats, planting beds and steps, but for this example we will just stick to the basics, a straight line timber wall.

Tools Required
Materials Required
(Check your local Builders Merchant)
Sleepers
Cement
Ballast
Pea beach shingle (stone)

Construction stages
1. Site Analysis
First of all you must decide where the sleeper wall is going to be located, Have a good think and discuss your options, this may be an obvious choice in a small garden, but not so if you have a vast area to play with. Think about the most practical location, how is this addition going to improve your garden space? a few points to consider -
Budget
Height
Size / Length
Material Durability
Shape
Purpose
Style of finish
Skill Levels
As with all building projects, the key factor that will help determine the above points is Cost, set your budget and work out what you can achieve with it.
Sleeper Options
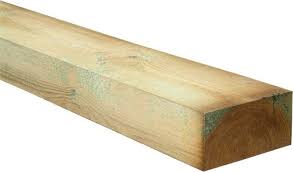
Soft wood
Cheap and cheerful, Softwood sleepers and relatively low cost, you can expect to pay between £18 & £23 per sleeper. They are lighter in weight and softer to cut than the other options, making construction a little easier. If you opt for using them, be sure to buy Treated Timber or else they will soon deteriorate and the wood will be rotten in no time. An advantage of the softwood sleepers is they tend to be straight, and measurements are accurate. So, if you are looking for a contemporary clean line style, and your budget is tight, Softwood is probably your best option
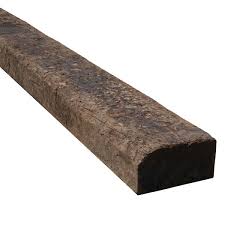
Railway
Mid Range in price is old railway sleepers. They tend to be darker in colour, and ooze with more character. Due to their past life, they may still have the remnants of tar and/or metalwork from the railways! they can be dirty and oily, especially on a hot day! do not use them for seats. Cost wise, they are a little more expensive than the Softwood option, ranging from around £20-£25 each. If your looking for a bit more character, salvaged railway sleepers could help you create that quirky feel.
Oak
The hardwood option, Recommended by Crafted Landscapes, is Oak. For the best durability, overall character and quality finish this option is by far the best. The price reflects this, Average costs range from £30-£40 per unit. They are heavy to lift, and can be tough to cut / drill, but this just shows the underlying strength when used as a retaining wall. Always inspect your Oak sleepers as some tend to be slightly bent or have differing sizes. The colour will change over time, and once weathered, will become a beautiful silvery grey.


From Left to Right - Softwood, Railway, Oak
Once you have decided upon the location and size specifications, its time to order your materials and get grafting.
2. Excavation
Excavate the existing bank / soil to create a clear working space in which you will build the new wall, Use your Tape measure for accuracy. Try to get your base as level as possible Using your Spirit level . Excavate using a Spade, Shuvel and digging Graft, if the area is on the larger size, you might want to consider hiring a mini digger. Move and pile your soil to one side using your Wheel barrow, this spoil will be re used to infill the retaining wall and create a level platform, this method is know as "Cut & Fill".
3. Building Lines
Now that you have your space to work within, Set up a String line, this will be used to ensure you are building the wall in a straight line. Of course you may be following a curve or other shaped line, if this is the case, use a line spray to accurately mark the ground as required. In this guide, we are referring to a straight line wall.
4. Laying the sleepers
Lay down the first sleeper horizontally in line with your string. Using a Spirit level, check it is laying plumb and level, If one end is low you can temporarily lift it up using some slate, brick or stone to get the levels accurate. If the levels are completely wrong, re-assess the ground by digging more or in-filling to suite. Levelling the face can be done once the vertical sleeper uprights are bolted to the horizontals, do not worry to much at this stage. Ensure you leave at least 150 mm between the wall and the bank, as you will require access later on in the project.

4A.
Repeat step 4, laying down several sleepers in a row, the line of the wall should start taking shape. Tap the ends of the sleepers using your Club Hammer to ensure each sleeper is tight against one another.
5. Digging Holes
Now that you have a line to follow, you can begin excavating the holes for the vertical sleepers. These will be the main support for the wall, and also act as a fixing point for the horizontal members to be bolted to. A general rule of thumb would be at least one third of the vertical sleeper should be concreted in the ground, obviously this variable will change depending on the height, so dig the depth accordingly using your Graft & Post Grabs.

5A.
Repeat step 5, Excavating in between each of the joining sleepers. digging the holes ready for insertion of the vertical sleeper.
6. Building up the height
Working your way along the line, add more sleepers horizontally to the required height, if your first sleeper was levelled correctly, the others should follow, ensure you check and re align if necessary.

7. Marking up the vertical sleepers
Before putting your vertical sleepers in place, now is a good time to mark the holes for the bolts, using a Carpenters Pencil and Carpenters Square, mark your drilling holes, you want to get this as accurate as possible, there is nothing worse than seeing bolts at different heights on the walls. I recommend using two bolts for each sleeper, ensure you keep a good distance between each hole and the edges, and once you have set the dimensions using your Tape measure, stick to it for each upright, Mark the holes in pencil with an 'X'.
8. Pre drilling the vertical sleepers
Now all your holes have been marked, its time to pre-drill them, No matter what wood you have opted to use, this is a key step, preventing the wood from splitting when insertion of the screw takes place. NOTE Oak will be tough to drill, ensure you use a quality wood piece. Drill & Drill Pieces

9. Bolting Up
Place your Uprights within the holes and hold plumb against the horizontal sleepers, We tend to put them in front of the wall, you want to position each one central of the join, ensuring each sleeper has an equal amount of timber to screw into. Using your landscaping screws, Drive them into the upright and through the horizontal timber, joining the two members together securely. For a more substantial fixing, you can insert a threaded bolt all the way through, securing with a nut and washer at each end, this way is more technical and requires further skill to ensure the drill holes are straight and inline.

9a.
Repeat step 9, on each of the uprights, ensuring the wall is level and straight along the way.
10. Concreting
Once everything is fixed and secure, its time to check the levels one last time, adjust if required. Now pour concrete into your holes, You can mix yourself using Cement and Ballast, or alternatively use rapid hardening Post Crete.
11. Drainage
It is always good practice to insert a Perforated Drainage Pipe at the bottom of your retaining wall, this is why we have left a gap between the wall and bank. 60-100 mm diameter would be great, ensure there is an exit point so the water pressure does not build up behind the wall, or rot the back side of the sleepers. Position the pipe so it is falling towards the direction of exit.
12. Infilling
The back of the wall is ready to be in filled, It is recommended that back filling is done 2-3 days after concreting ensuring the pressure does not move the newly set wall. Pea shingle stone is the perfect material for this. What you do further beyond this point is up to you, More than likely you would infill to create a level area that was once sloped, Using the soil spoil that was placed to one side at the initial stages.

13. Finishes
If you are a perfectionist like me, there may be some rough edges that require sanding down. Using a Sander / Planer, you can angle the tops of the vertical sleepers to give further detail, this also helps water drip off of the sleepers preventing rot.


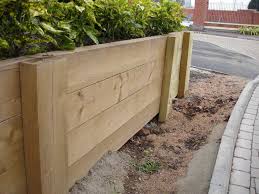

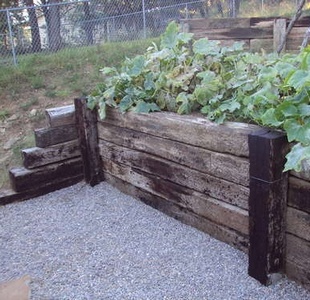
*Finished examples
Conclusion
Thank you for reading my HOW TO build a Sleeper Retaining Wall blog! I hope you have found it useful, and perhaps inspired you to build your own! For similar HOW TO projects, feel free to come and visit my website - www.craftedlandscapes.co.uk
Id love to hear your thoughts on my blog post, please comment, share and like.
Also, feel free to follow me on other social media platforms as shown below.
I hope you have found this HOW TO guide easy to follow and informative. If any of the steps are unclear and require further clarification please feel free to contact US.